Welcome back!
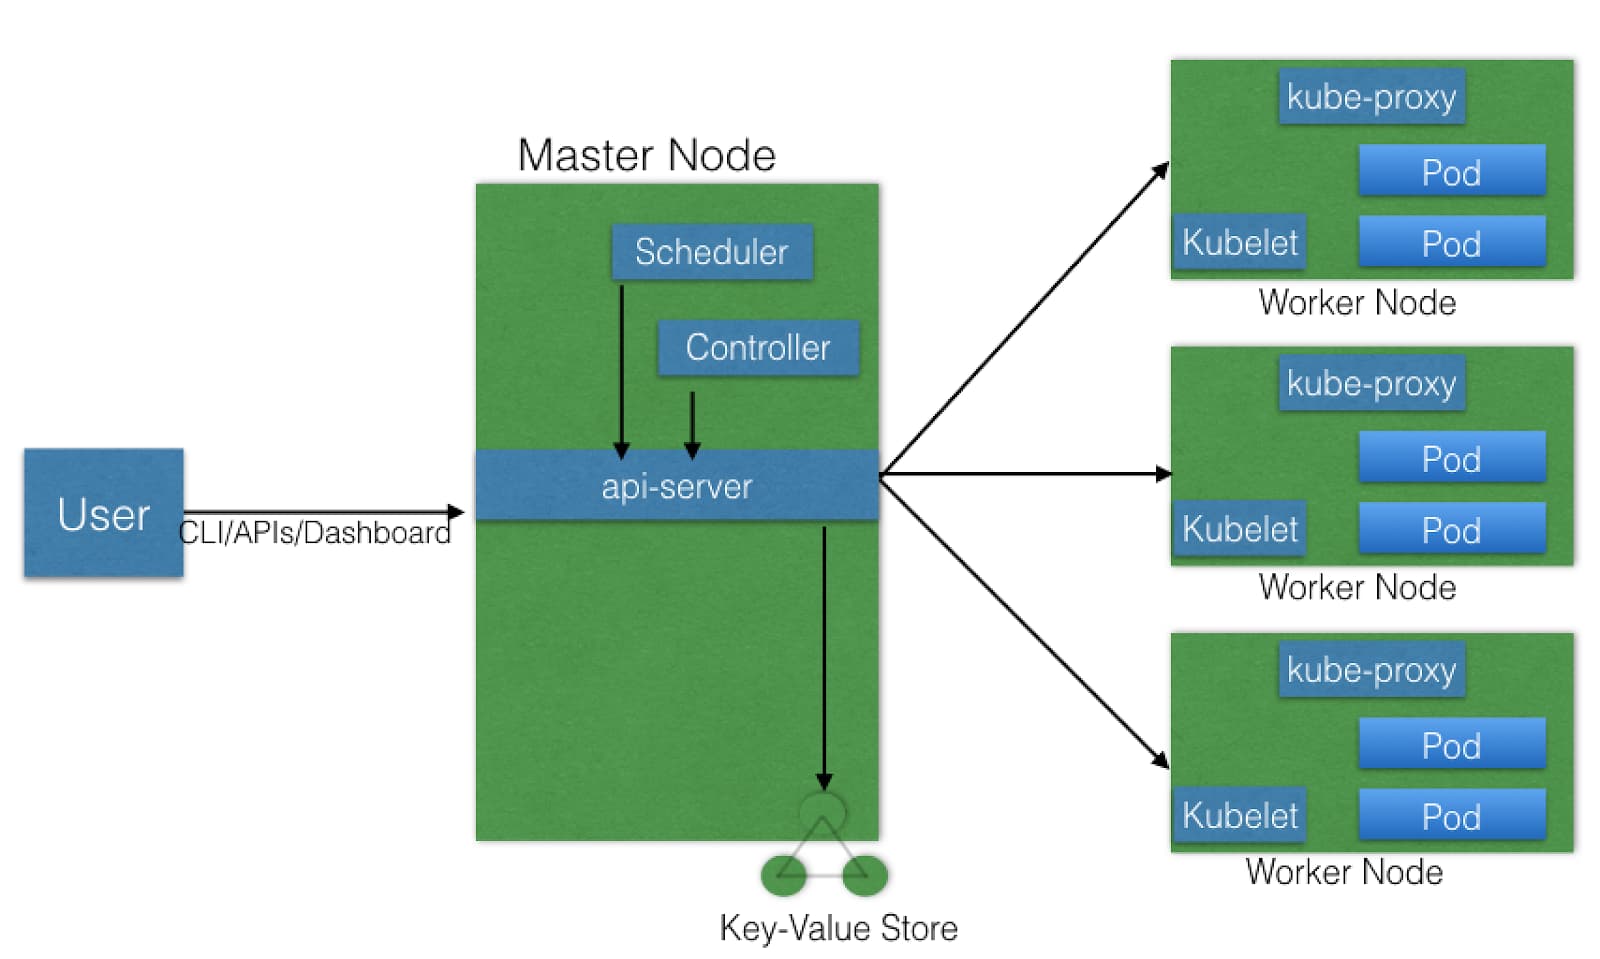
Are you ready for round two? I sure hope so. If you haven't read the previous post, I do recommend that you do that first, as there's plenty of relevant information that I won't repeat here. With that out of the way, let's continue where we left off, with worker nodes! I'll attach the architecture diagram again for easier reference.

Kubernetes Architecture Diagram
Worker Nodes
The main point of a worker node is to provide a running environment for client applications. These applications are encapsulated in Pods, which are subsequently controlled by the master node’s control plane agents. Besides the master node’s components, the following components are necessary for worker nodes to function completely.
Container Runtime
Kubernetes is an orchestration engine, it doesn’t do the dirty work of handling containers. Docker, CRI-O, containerd, rkt, and rktlet are all supported runtimes. More may be available in future versions, as Kubernetes is a very active an evolving project.
kubelet
This component is the main agent on a worker node, interacting with the container runtime. Below is a list of things it is responsible for:
-
handling requests to run containers
-
managing necessary resources
-
watching over containers on the local node.
-
mounting volumes to pods
-
downloading secrets, which are objects that store/manage sensitive data
-
reporting pod and/or node status to the cluster.
-
kube-proxy
-
In order to abstract the details of Pod networking, the kube-proxy is responsible for dynamic updates and maintenance of all networking rules on the node. It also forwards connection requests to the Pods, exposing the container on the network.
Add-Ons
Typically you’ll want to install a DNS server in order to assign DNS records to Kubernetes objects and resources, as it is helpful in resource auto discovery. You may also find the web dashboard useful for cluster management. Monitoring and logging add-ons are available as well.
Data Storage
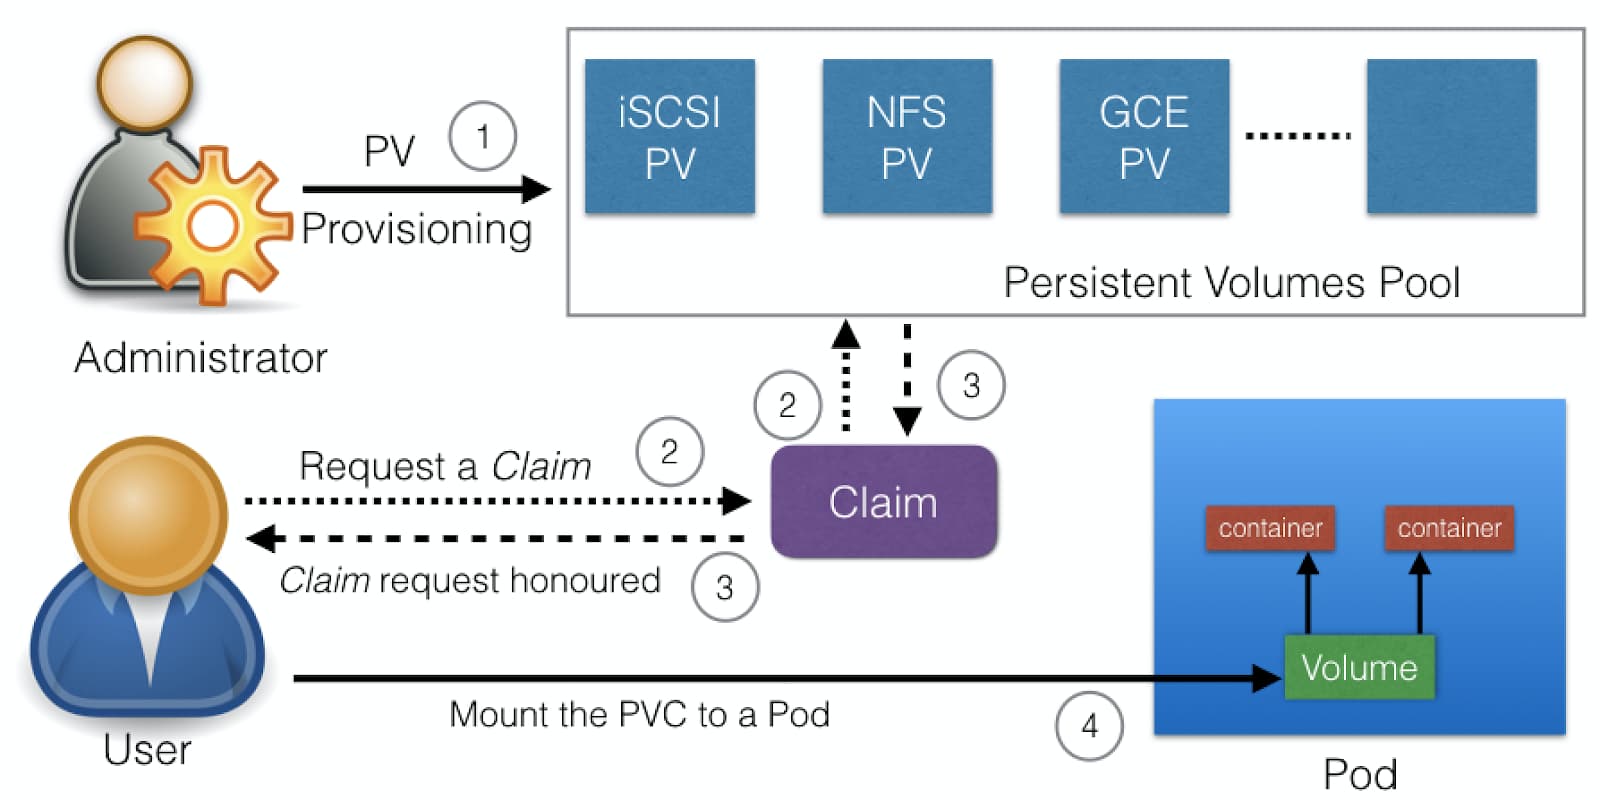
Kubernetes uses volumes to store data, which are essentially directories backed by some sort of storage medium, could be cloud based or bare metal. Volumes are made available to containers within a Pod, so as those containers come and go, they have access to the same storage provided by the volume. However, Pods themselves can be ephemeral, so to separate storage lifetime from Pod lifetime, we use PersistentVolumes (PV). Users and admins use the PersistentVolume API to manage storage, and the PersistentVolumeClaim API to consume it. An administrator might set up provisioners and parameters in a StorageClass to allow PV’s to be dynamically provisioned upon receiving a PVC. The following image illustrates the flow of setting up volumes for containers:

Kubernetes Persistent Volume Flow
As illustrated, an administrator sets up the StorageClass to allow dynamic provisioning of the persistent volumes available in the Persistent Volumes Pool. Notice that these volumes are not associated with any particular Pod. Next, the user creates a PVC, from which the Kubernetes control plane tries to find a suitable PV to bind the claim to. If it succeeds, the claim can be used by a Pod.
Conclusion
There is so much to cover in Kubernetes, this is barely scratching the surface. It’s my hope that by the end of this article you understand at least why Kubernetes is used as well as a very general idea of how it works under the hood. Containers are everywhere, and without orchestration in large projects, deployment may very well be an exercise in herding cats.
If you’re ready to get more involved in Kubernetes, check out any of the previous resources I mentioned! Additionally if you’re a little more hands on and would like to get something up and running quickly, check out this article. You’ll be using the Google Kubernetes Engine and Semaphore CI/CD, and it should only take about 10 minutes.
Learning by doing has noticeably heightened my comfort level with Kubernetes, so if you’re still on the fence about it, I highly recommend looking into the previous article or installing Minikube. The latter is a tool that allows you to easily run Kubernetes locally, and while it might only allow for a single node cluster, it’s still a great way to get a feel for developing with Kubernetes. Happy learning!


