At WWDC 2019, Apple introduced its new framework for building user interfaces, the SwiftUI framework. It is a declarative way of creating user interfaces for any Apple device and works for devices targeting iOS 13, macOS 10.15 or watchOS 6 or higher. Since the introduction, a lot of people online have been really hyped and excited about the new unified way of creating user interfaces for all the Apple devices and I think rightfully so, it looks pretty awesome. Even though it is still early days for the framework, getting ahead and already learning it is not a wasted effort as eventually, SwiftUI will be the de facto solution for creating user interfaces for all the Apple devices. There are already a lot of great tutorials, blog posts and guides about it online, some of my favorites so far have been (free!)
hackingwithswift.com tutorials and raywenderlich.com video courses and of course Apple’s own
tutorials on SwiftUI.
New projects estimated to take a couple of months or longer should probably already consider going with SwiftUI since by the time you’ll release the app, more and more users will have upgraded to a supported version (according to
Apple, already 50% of the users have upgraded to iOS 13). If you are currently working on a UIKit project, you could implement some of your views in SwiftUI targeting iOS 13 or greater and start to migrate towards the new framework, if you decide it’s worth the effort.
Using SwiftUI
I had the opportunity to try out SwiftUI at work recently and I built a pretty simple doorbell app for our office that incoming guests can use to sign themselves in and notify the person they’re about to meet. Below I try to explain and open up some of the concepts of SwiftUI: creating layouts, using modifiers and creating custom styles.
Building views and layout
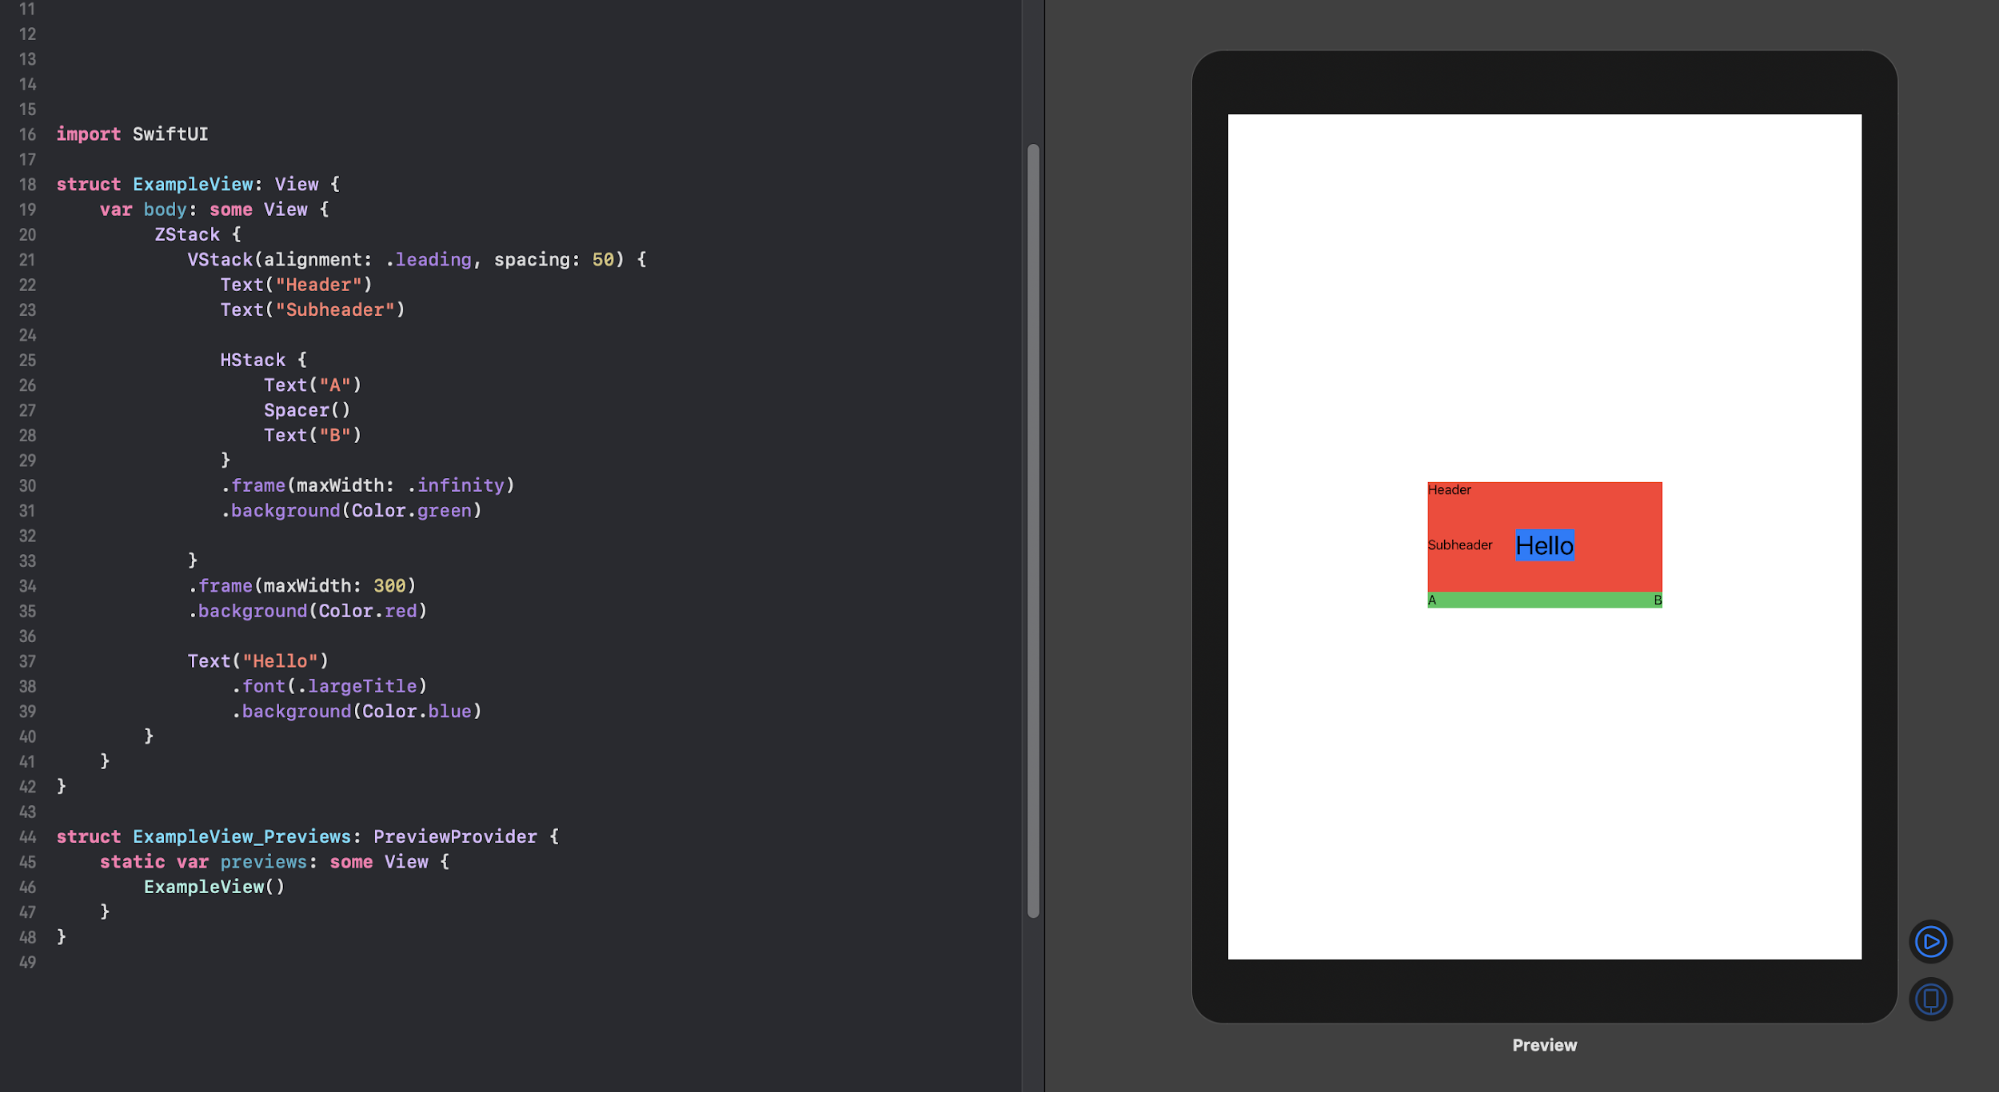
SwiftUI interfaces are built up from structs that implement a View protocol and contain a single required computed property called body that has to return some View. The computed property is also only allowed to return a single View, so if you are returning more than one item, you’ll need to wrap your children in a single container view. For that, SwiftUI has a couple of options, including stacks, that also control the order of the items on the UI, the VStack, HStack, and ZStack. VStack allows you to order content vertically, HStack horizontally and ZStack lets you place content on top of each other, for example, if you want to add content on top of an image. You can also of course nest these stack views to create more complex layouts:

Creating a layout with SwiftUI
Here, a VStack contains two text elements that come after each other vertically. Within, there is a nested HStack that has two text elements ordered in a row with a Spacer component (
Spacer is a component that expands to fill out the empty space between the views). On the top level, the VStack is wrapped within a ZStack that places a text view containing “Hello” on top of the VStack content. The stacks also take in a couple of attributes that you can use to adjust the content alignment and spacing between child elements.
One of the awesome things about SwiftUI is that it also provides the handy live preview of the UI on the right side of the code editor that you can see in the above image. As you write your views, the preview will update according to the struct implementing the PreviewProvider. You can also press the play button on the bottom right to interact with the preview. Some useful shortcuts for handling the preview are OPTION+CMD+RETURN for toggling the visibility of it and OPTION+CMD+P for reloading it if it is stuck for whatever reason.
Modifiers
To customize SwiftUI views, you’d use something called modifier functions. SwiftUI comes with a bunch of built-in modifiers, such as padding, background color and font modifiers for example. In the above stack example, you can see some of these modifiers in use. You can also implement your own custom modifiers to do something more specific as well which makes reusing styles across your Views really easy. SwiftUI also provides modifiers for reacting to lifecycle events of the views, onAppear and onDisappear, that you can use to perform some actions when a view goes in or out of the view.
One important thing to note about the modifiers is that applying each modifier returns a new view with the changes in place. This means that the order of the modifiers matter, an example below demonstrates this behavior:

In SwiftUI, the modifier order matters
In the top text view, the background modifier is applied first, going around the text view. Next, padding is applied, signified by the white-space in the picture, and lastly the border. In the bottom text view, however, the padding is applied first, so the area for the background-color to fill is larger as the text view itself now takes more space. Lastly, the border is applied again. You can find more in-depth information about modifiers
here.
Creating reusable styles
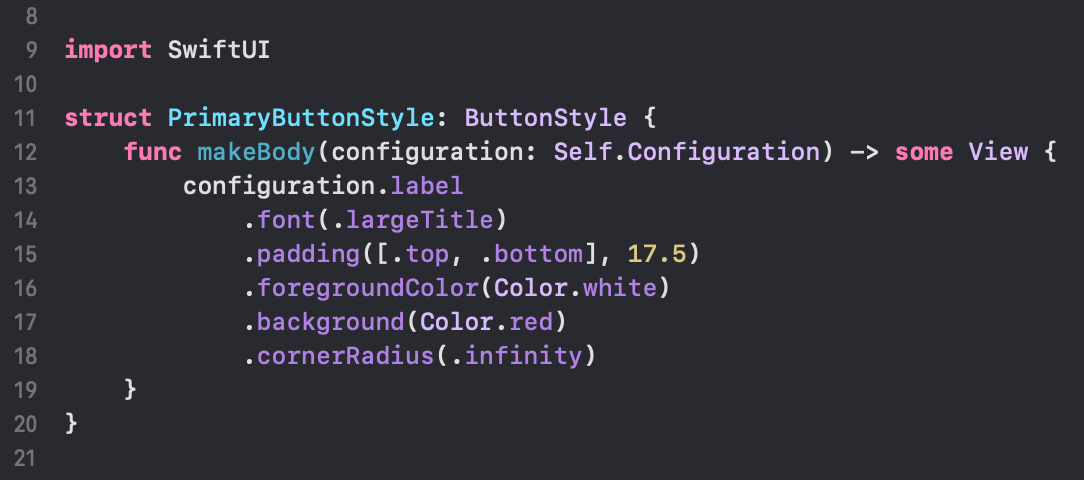
SwiftUI also lets you create your own reusable styles for your components by extending View protocols such as ButtonStyle or ToggleStyle. You can attach these styles to your view with a view specific modifier, such as .buttonStyle() or .toggleStyle(). Not all views seem to be modifiable with custom styles like this, for example, TextField doesn’t seem to have a protocol for adding custom styling this way, but you can still attach built-in styles like .textFieldStyle(RoundedBorderTextFieldStyle()) to the view.
Below is an example of creating a custom button style. You only need to implement a single makeBody function and attach the custom styles to a configuration label attribute passed to the function.

Custom button style in SwiftUI
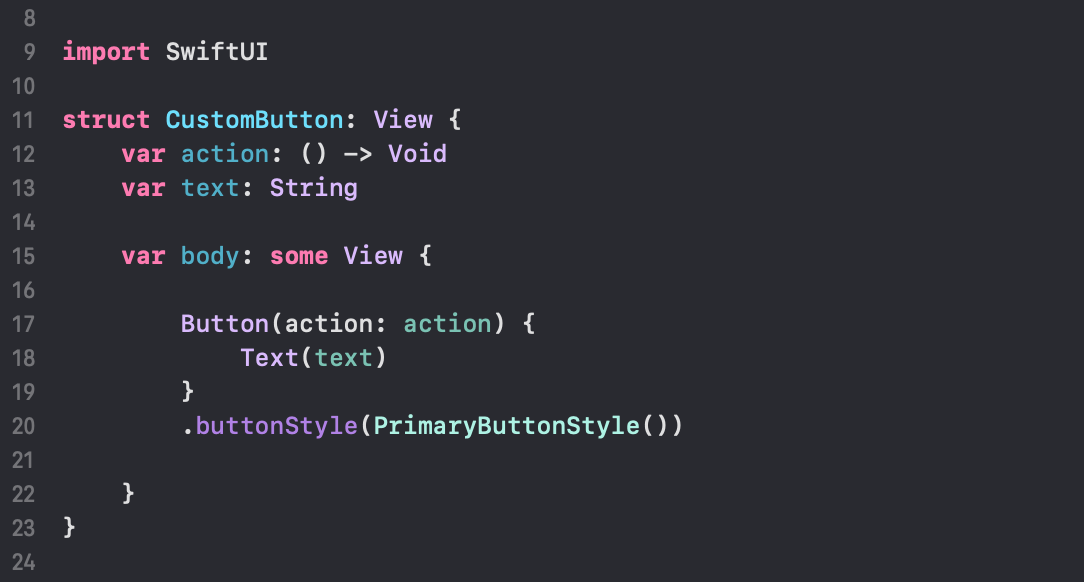
To attach the style to a button you’d add it as follows

The custom style applied to a button
Recap
Overall, I think SwiftUI seems pretty awesome. It is pretty easy to learn and the declarative nature of it makes it pretty easy to create stuff with, as most of the complexities are handled in the background by SwiftUI. Creating simple layouts and views is pretty straightforward and creating more complex ones would not be an issue either, as you can create custom styles, extend and compose the UI elements that SwiftUI provides. SwiftUI also works with current UI frameworks, so you can still use UIKit views in your application, for example.


